
This is the story about how the Mischief Quilt came on my radar and why it became my long-term project!
I fondly remember receiving Karen’s (aka Karen, formerly known as The DIY Addict, now known as The Quilt Kit Co) direct message on Instagram about her templates. And feeling completely honoured that she reached out to me. Wanting to help her out and play with some fun hexies. And then immediately being concerned about timelines!
I know how time-consuming hand piecing can be for me. I’m not a speedy hand sewer; for me, hand sewing is all about slowing down and enjoying each stitch. Speed is not the focus here. She assured me the idea was to have fun and test drive them. Concerns alleviated, I was so excited to realise that I was about to start my first English paper-pieced quilt journey!!! How freakin’ cool! And, terrifying!
That’s a lot of cutting. Lots of basting. A whole heck of a lot of hand sewing. To commit to. But I was intrigued too.

This post contains affiliate links, meaning, at no additional cost to you, if you click through and make a purchase, I may receive a commission.
Mischief Quilt layout options
Before even getting started, I had to figure out which version I wanted to make.
The kit comes with everything you need and includes instructions for 4 variations. I opted for variation 1, because, well, it just caught my eye and I liked the central star. But it also means that this kit can keep me entertained for years to come – love that!
My design process
My design process can be quite flexible. I often design as I go. It can be a jumping-off point that I’m so inspired by, that I just go with that feeling.
That’s kinda what happened here. I had some scraps (gosh, a lot of my quilting stories start with “I had some scraps”!) leftover from my Kaleidoscope Festival Quilt and Peaks & Valleys Table Runner projects. And I was really bummed to have to give those back to Camelot Fabrics!
I absolutely adored this collection. The geometric nature of the prints paired with the soft lilac and cream shades, with some bold accents of indigo.
So much so, that I already made some heart appliqué quilted mug rugs. And the rest I’ve been hoarding for a future special project.
And the Mischief Quilt is just that!

Evaluating the fabric situation as you go
Before diving in, I knew that I wouldn’t have enough Kaleidoscope scraps to make all 100 central stars. And that doesn’t even count the complimentary stars and hexies to join everything together.
Eek!
That’s a WHOLE lot of pieces.
So, for now, I’m just taking it one day at a time. I’ll see how far these scraps get me and then I’ll re-evaluate at that point.
This is a long-term project. I can’t go too crazy lest my tendinitis flares up again. And I really don’t want that.
These little pretties are getting created whenever, wherever I can, and feel like it. How’s that for no pressure, just enjoy the process kind of project! Yasss.

English paper piecing tips
In need of some EPP tips? I sure was!
And Karen has some great video tutorials on her Youtube channel (watch them here). I decided to check out all of the video tutorials Karen has shared before I even selected my fabric.
I highly encourage you to check out her templates and tutorials, she gives such amazing tips to make your EPP experience as stellar as possible. Seriously, she’s pretty awesome!

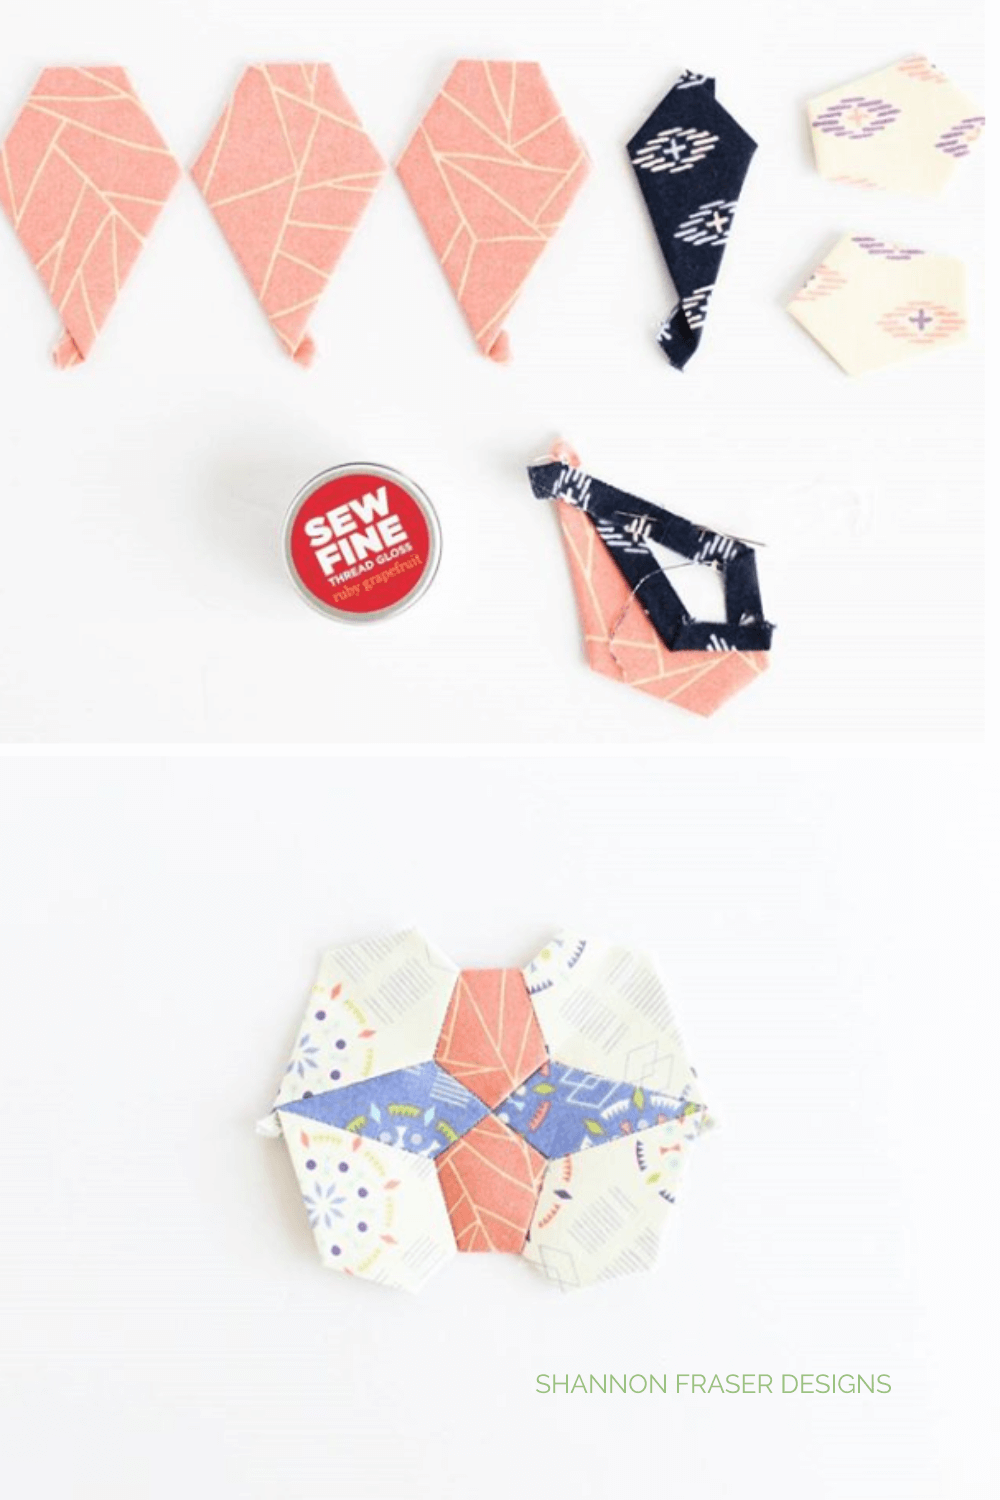
Thread basting vs. glue basting
I tried thread-basting my pieces, and it works quite well. But, I kept hearing all the fuss about glue basting, and I was intrigued.
Since I’d received my Sewline Glue Pen for Christmas (you know you’re hooked on quilting when notions pop up on your wish list!!) I was primed for my first session. OMG, what an awesome little tool she is.
I can glue baste much quicker than thread basting, and, wanting to save my hand sewing for the joining, I figured glue basting was a no-brainer.
After my first few stars, I went into assembly mode cutting up the fabrics and glue-basting several stars at once. I couldn’t imagine sitting down and just cutting 100s of little pieces. But doing it in batches where I was only cutting about 10 stars at a time, it felt less daunting, more manageable, and would keep the boredom of repetition at bay. Here’s a little sneak peek at my assembly lines.

My go-to materials and tools for English paper piecing
I share lots of my favourite tools on my Resources page, but here’s a focused list of my can’t live without tools for EPPing:
- Fabric/ Fabric Scraps
- Olfa Splash Rotary Cutter with these blades
- Mischief templates and papers by The DIY Addict (aka Karen)
- Sewline glue pen – this thing just rocks!
- Clover Wonder clips – to keep everything in order without stabbing yourself with pins
- Milliners/ Straw needles size 10
- Aurifil thread in 50wt
- Thread Heaven (an awesome thread conditioner that is sadly no longer being made – here’s a similar alternative that I haven’t tried, or there’s also this great all beeswax alternative, which has become my go-tp)
Shop all of my most used notions here.

Current progress
So far, I’ve got one row done (10 per row)! And that’s taken me…well, let’s not focus on how long it’s taken me – ha! The point is, I’m having fun and enjoying the process. That is, after all, the most important bit – right?!
I so admire my quilty friends who seem to be able to whip up EPP blocks in no time flat, but instead of getting discouraged by my slow progress, I prefer to look to them for inspiration that I too, with time, will improve my EPP game.
In the meantime, I hope this post inspires you to take on a long-term project and encourages you that there is happiness to be found in taking your time, not rushing, and just enjoying the quilty adventure; at whatever pace suits you best!
Have you got a long-term project that you’re working on? I’d love to hear about it in the comments below!
Happy stitching!
xo,
Shannon
PS I’m so excited that I’ve got one row done, that I feel like I’ve accomplished a milestone in this project. So, I’m linking up for Finish it up Friday with Crazy Mom Quilts as a way to celebrate and keep the sewjo for this project alive
Never miss a post – sign up for the weekly newsletter.
This post uses affiliate links. For more info, visit the FAQ page.

I have felt very discouraged by the thought of the time investment in EPP as well, and I love that you are honest about it and jumped in anyway! This is stunning and it will be nice to see the project grow for you.
Some projects, EPP in particular, can feel so overwhelming! I just figure the worst that can happen is that it will sit in my WIP pile (maybe forever!), but I won't know until I give it a try 😉
Sounds like you are really enjoying this project – which is really cool! I tried to make a few EPP hexies a little while ago and this is definitely not something I enjoy. 🙂
At least you now know EPP isn't for you! It's not something I can spend day after day on, but I do find enjoyment in sneaking them in here and there, which is why this project will be years in the making 😉
The links to the original pattern creator (DIY Addict) seem to be bad. I would love to purchase this pattern. Where can I find it now?
Hi Mary, Thank you so much for reaching out! I’ve reached out to Karen to see if she’s still offering the Mischief Quilt and templates as I’m not seeing it on her new site: https://www.thequiltkitco.com/ I’ll let you know if I hear anything!
Hi Mary, I heard back from Karen and she said she still has them but they aren’t listed on her new site. Send her an email to karen@thequiltkitco.com and she’ll get you sorted with the Mischief quilt 😁
where can I find the pattern for the sewing bag with the birds on it. sooooooo cute!
Unfortunately, there’s no pattern for the sewing bag with the birds on it. That was made by Megan’s friend. I agree, super cute!