
It’s official! You’re halfway through the Shattered Star Quilt Along!
And this week is a fun one because you’re diving in and starting to piece your Shattered Star quilt blocks!
Cue the chain piecing quilty good times 😊
WHAT YOU’VE LEARNED SO FAR
All the preparation you’ve done to date has set you up for this very moment.
So far, you’ve:
- Checked out all the essential tools and notions you’ll need.
- Tackled picking your fabric and considered their colour values,
- Learned all the ins and outs of pressing them nice and flat; and
- Picked up tips on cutting them accurately.
- Made half square triangles using the 8-at-a-time method.
- Learned how to trim your HSTs using a regular and specialty HST ruler.
All of these lessons have created a foundation for you to build off of. Keep these tips in mind as you continue to piece your Shattered Star quilt!
If you haven’t already, grab your Shattered Star quilt pattern and let’s piece some quilt blocks!

*This post contains affiliate links, meaning, at no additional cost to you, if you click through and make a purchase, I may receive a commission.
WHAT YOU’LL NEED
Before diving in, here’s a list of materials and notions you’ll need to piece your Shattered Star quilt blocks:
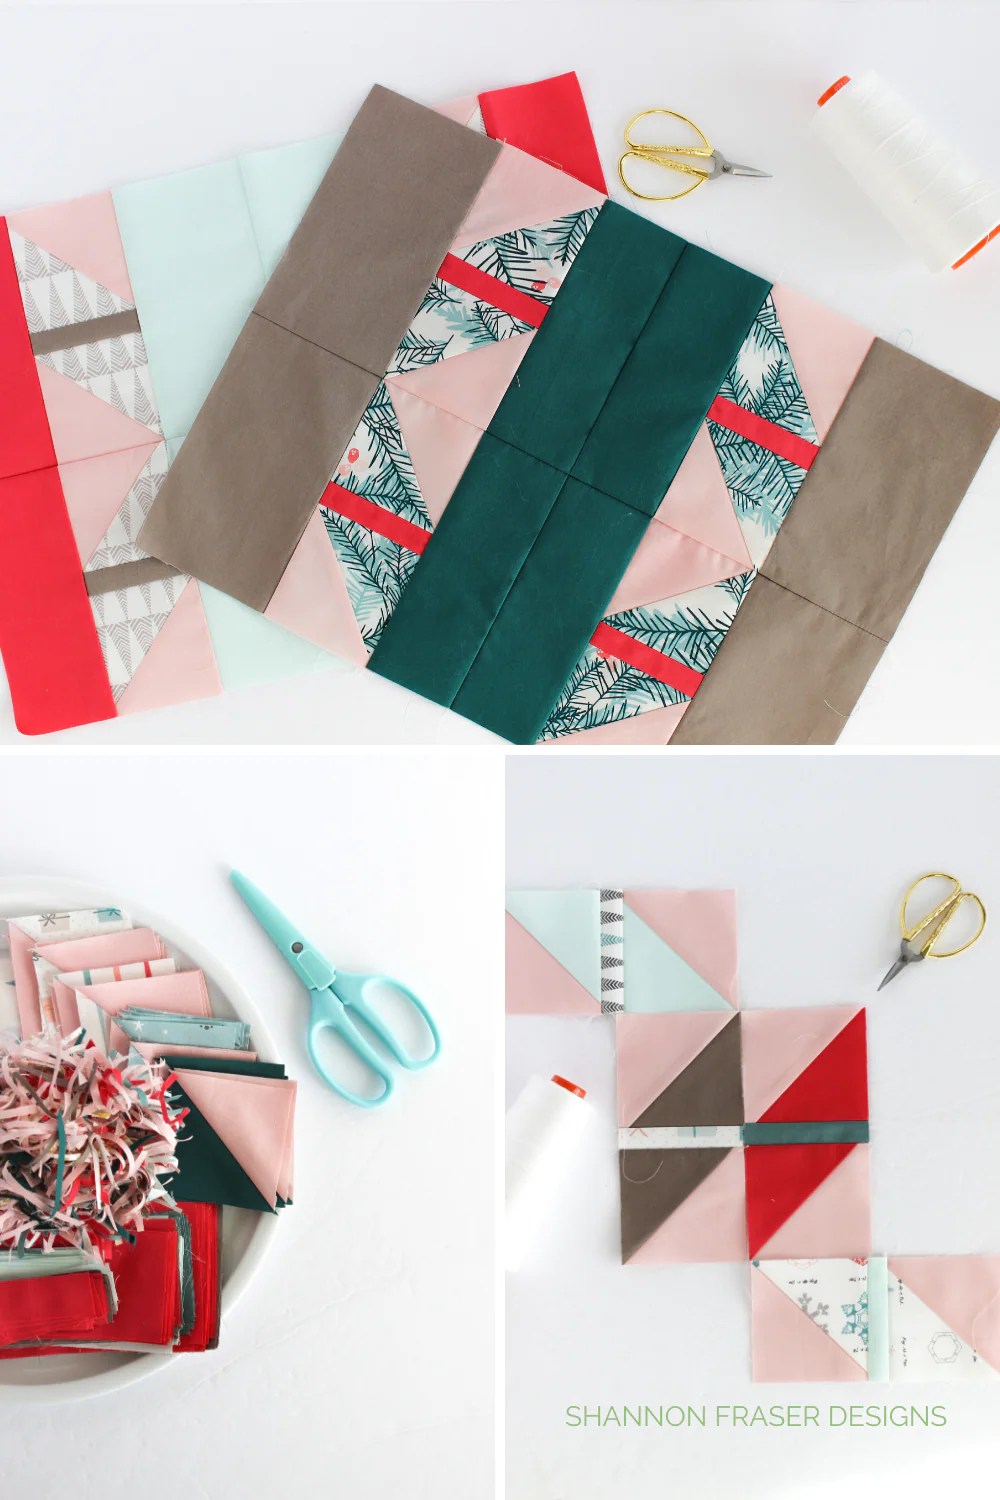
- You’re pieced and trimmed HSTs
- Your Fabric C, D and E pieces, I’m using a combination of Little Town fat quarter bundle paired with AGF PURE Solids in: *Flamingo, *Smooth Pebble, *Icy Mint, *Spruce and *Zambia Stone.
- *Sewing machine – I sew on a Juki TL-2010Q and use a 2.0 stitch length when piecing.
- *Thread for piecing – this is my go-to
- *Pins (optional) – but if you’re just starting out, pinning reduces shifting which leads to more accurate outcomes.
- *Scissors for snipping your threads
- *Iron
- *Ironing board or wool mat – save 10% at The Felt Store with code: SHANNONFRASER10 (now until December 31, 2020) – Canada & US.
- *Tailor’s clapper – this is optional but works great if you prefer working without steam.

HOW TO PIECE SKINNY STRIPS
The idea of small piecing seems to either elicit a sense of fear or excitement in quilters! There doesn’t seem to be any in between on this one 😉
No matter what camp you fall in, I’m here to walk you through the fun that is small piecing!
STEP 1 – HOW BIG IS YOUR NEEDLE OPENING?
The technique couldn’t be simpler, but the first thing you need to ask yourself is “How big is the needle opening in your needle plate?”
Why is this the first step?
Because the number 1 problem/ challenge sewists have with small piecing is having their sewing machine “eat” their fabric.
This used to happen to me allllll the time when I sewed on my Singer Inspiration. It was the pits.
So, I totally understand the frustration that comes with having a large needle opening.
If this is the case for you, fear not! I have a solution for you 😊
STEP 2 – LEADERS & ENDERS (OPTIONAL, FOR THOSE WITH LARGER NEEDLE OPENINGS)
Enter Leaders and Enders.
Never heard of them? Well, they’re your small piecing friends!
What are they?
They’re pieces of fabric – either scraps or not – that you use to get a new set of chain piecing started/ continued.
Normally, your sewing machine likes to “eat” your fabric pieces at the very beginning of a session (i.e. the first patchwork pieces you start your session off with). Once your sewing machine is in full swing, it usually behaves and allows the small pieces to go through without getting stuck in the larger needle opening.
The concept is simple, simply feed your “leader” through your machine so that it’s used as the sacrificial patchwork should your machine decide to misbehave. You can also end with an “ender” so that your machine is ready to go for your next chain piecing session.
TIP – Leaders and Enders are also a genius way to sneak in a second quilty project that get’s stitched while you focus on your primary quilt project. You can keep a basket next to your sewing machine with your cut pieces (especially fun for scrappy quilts) and use them as leaders and enders. Before you know it, you’ll have a second quilt top pieced just from using this fun technique. Plus, you’ll save on thread! Bonus!

STEP 3 – PRESSING THOSE SKINNY STRIPS
Once you’ve chain pieced all your skinny pieces to your half square triangles, it’s time to take it to your pressing mat and give them a good press. Notice I didn’t say “give them a good iron”.
This is an important distinction.
If you opt to ‘iron’ instead of ‘press’ this strip, you will most likely end up with a distorted center strip that will cause you piecing headaches when you go to attach the second HST. You’re blocks will no longer be nice and square and you will have this bowing effect in the center. You wan to avoid that!
And you avoid that by ‘pressing’ your pieces and being gentle.
WHY PRESSING MATTERS
Pressing helps keep the integrity and true size of your block. This helps keep your blocks nice and straight and accurate, making it easier for you to piece accurately as well 😊
Have you ever found yourself stitching blocks together only to have them not align because one’s bigger than the other? There’s a few reasons for this problem and one of them can be your pressing habits.
If you’ve stretched your blocks from ironing them, then even though you may have started with nicely cut squares, as you’ve pieced your blocks, you’ve distorted the shape by ironing it too aggressively.
Ask me how I know – ha!
The good news is this is preventable all by paying attention to your pressing habits.

STEP 4 – HELP! I IRONED AND NOW HAVE BOWING
If you find that your center strip is bowing a little (meaning it’s got a little hump instead of being nice and straight), then you can opt to trim that bit to get it back to being straight. Just be cautious that you don’t trim too much. Otherwise, you’ll end up with your central HST units not fitting when you go to attach the side pieces.
Now you know why I keep talking about the importance of pressing your quilt blocks instead of ironing them 😉
VIDEO TUTORIAL
We’re focusing on two key quilting techniques, so it’s only natural that we have two videos!
First up is seeing tiny piecing in action. I talk about pressing that center strip and what to look out for.
If you’re working on an older sewing machine or one with larger needle holes on your sewing machine plate, then this next video is for you! See Leaders & Enders in action!
How easy is that?!
TOP TIPS FOR SMALL PIECING SUCCESS
Here are my top tips for small piecing success:
Place your skinny strip on top of your HST (instead of HST on top and skinny strip on the bottom). Since HSTs are prone to stretching, I find I get better accuracy when I have the skinny strip on top.
Set your seams. All this entails is placing your hot iron over your stitches BEFORE you press your seams to the side (or open). This allows your stitches to “sink” into the fabric and become “one”. It will also warm up your fabric making it more pliable and easier to press back. Just be cautious, as the warmth of the iron means the fibers have relaxed which means they’re more prone to stretching. Which brings me to my next tip.
Be gentle! You want to press and not iron your pieces. Go back to the Lesson 1: How to Press Fabric for a full review on pressing techniques. You might be tempted to “pull” on the fabric so that the little strip stays in its new pressed state. I encourage you to be gentle and, if your pieces are not staying flat, use a *tailor’s clapper to get that seam to stay down.

GIVEAWAY
This week’s giveaway is sponsored by Clover USA and Finley Fabric!
I’m a big believer in stocking the right tool for the right job and Clover USA has a plethora of sewing and quilting notions to choose from. They’ve generously allowed me to pick some of my all-time favourite notions of theirs so that you can bring them into your own sewing kit! Goodies include:
- *Wonder Pins these are new and I’m just getting to try them out, but the concept is genius!
- *Snag Repair Needle – this is a new to me notion that just seems smart to have in our kit!
- *Quilting Pins (fine)
- *Hera Marker
- *Natural Fit Leather Thimble
- *Seam Ripper

Our quilting expeditions wouldn’t get very far without some textiles and Finley Fabric has curated this gorgeous Ice Pop bundle featuring 12 Peppered Cotton fat quarters – yummynummy!

To enter the giveaway, you must:
- Be a Shattered Star QAL newsletter subscriber. (sign up here)
- Be following @cloverusa, @finleyfabric and @shannonfraserdesigns on Instagram
- Post a photo on Instagram of your Shattered Star Units between November 2, 2020 and November 8, 2020 at 11:59pm.
- Instagram account must be public.
- Tag @cloverusa, @finleyfabric and @shannonfraserdesigns on Instagram
- Include the hashtags #shatteredstarquilt #shatteredstarqal
Week 4 giveaway is open to USA and CDN residents only. Sorry my international friends.
What’s the one thing that has stopped you from skinny piecing in the past? Share in the comments below 😊
Happy quilting!
xo
Shannon
Never miss a post – sign up for the weekly newsletter.
This post uses affiliate links. For more info, visit the FAQ page.

Leave a Reply