
Do you ever make quilts that you’d love to hang on your walls?
After all, there’s only so many beds you need to cover and throws you need scattered around the house before you’ve maxed out your surfaces.
But what about your walls?
One of my favourite things is to turn my quilts into wall art.
You get to see the full quilt on display. There are some gorgeous quilts that take advantage of the entire quilt to showcase their design. Featuring those quilts on the wall allows you to enjoy that view on the daily vs having it folded on a couch.
Normally we think of smaller quilts as possible options to hang, but you can actually hang any size quilt – even a large king size!
The approach is the same no matter what size you’re looking to hang.
Read on for all the tips on how to do just that!

This post contains affiliate links, meaning, at no additional cost to you, if you click through and make a purchase, I may receive a commission.
MATERIALS NEEDED
Before diving into the tutorial, let’s cover what you’ll need.
The good news is, you don’t need to pick up too many materials and notions to hang your quilts, but you’ll need some basics, including:
- Fabric – for the sleeve – this will not be visible when hung up, so feel free to use scraps or leftover fabric from your project 😉 Here I’ve used trimmings from the backing of my Cloud Surfing Quilt.
- Thread
- Needle
- Rotary Cutter
- Ruler
- Pins
- Thimble
- Sit ‘n Sew Pin cushion
- Thread conditioner (optional)
- Iron
- A wool pressing mat – use code SHANNONFRASER15 to save 15% on your small, medium, or large wool pressing mat at thefeltstore.ca or thefeltstore.com.
PREPARING YOUR HANGING SLEEVE
This is super simple to do.
The first step is to cut your hanging sleeve.
A basic formula to follow is to cut your sleeve the exact width of the quilt you want to hang by 8 ½” tall. I’ve found the 8 ½” to be a little short, so I tend to go with this formula: Width of Quilt x 9″ tall. I also sometimes deviate on the width of my sleeve and dock about a ½” on either end (this latter change is really about personal preference).
For the quilt shown, I went with a starting sleeve size of 24″ x 9″ to fit my mini Modern Aztec quilt (pattern available here), which measures 24″ wide.
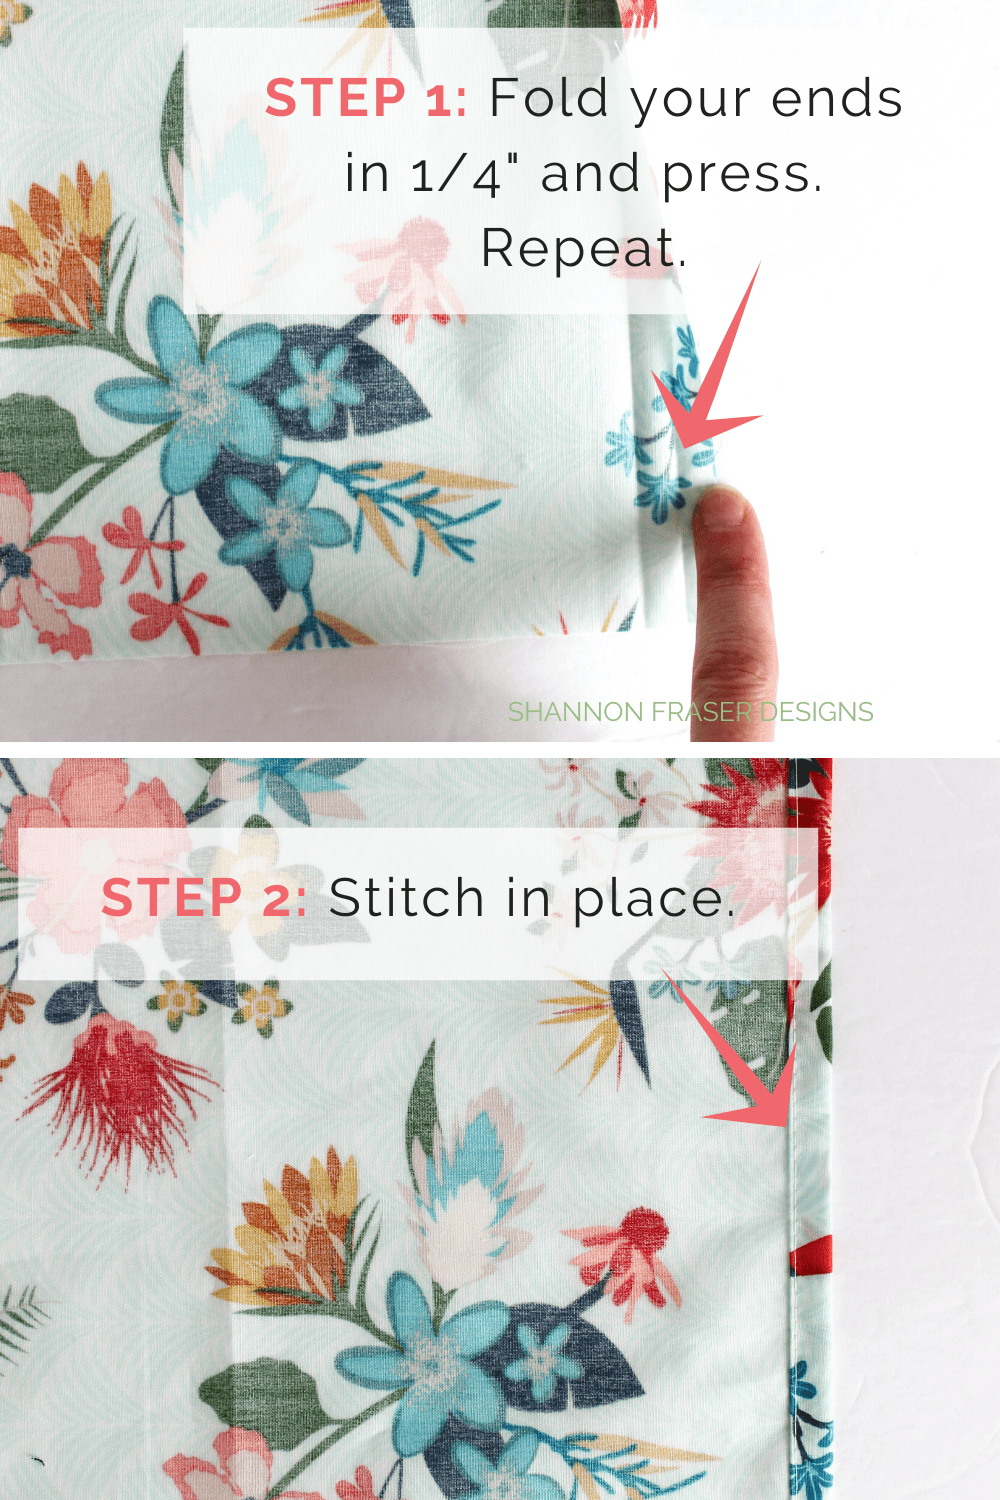
ENCLOSING YOUR SLEEVE ENDS
With the wrong side of the fabric facing up, fold the short ends of your quilt hanging sleeve in ¼” towards the wrong side of the fabric and press. Then fold in again a ¼” and press again.
Stitch in place an 1/8″ from the edge.

Now that your ends are nice and enclosed and seamless, let’s focus on getting the hanging sleeve enclosed!
PRESS YOUR HANGING SLEEVE
Working with the wrong side facing up, fold in half and press.
Open the sleeve and then fold in half way towards the crease you created in the previous step and press again.
Repeat with the other side and press again.
It will look like you have an accordion-looking piece of fabric. Fret not – you’re on the right track!


ENCLOSING YOUR SLEEVE
Now, align the raw edges with the wrong side of the fabric facing each other (i.e. right side of fabric facing out) and pin in place.
Using a ¼” seam allowance, stitch the raw edge together effectively enclosing the sleeve.
Press your seams open, trying to preserve the original crease marks you made in Step 4 (aka the accordion!).

Voila! You’ve just created your first quilt hanging sleeve 😊
ATTACHING THE HANGING SLEEVE TO YOUR QUILT
Now that you have your completed sleeve, let’s focus on getting her attached to your quilt!
With the seam side placed against the back of your quilt, center it along the top edge of your quilt.
Pin in place, making sure to leave some ease for the rod to slip into. Otherwise, the rod will bump out to the front, and your quilt won’t hang straight.

TIP: double-check you’ve left enough slack before tacking her down. I realized I made this mistake riiiiight before I was shipping out my Cloud Surfing quilt to hang in a show – cue the panic!


Using a blind stitch, stitch the hanging sleeve in place around the entire perimeter. Read this Quilt Binding Tutorial – Part 2 for tips on how to blind stitch for a seamless finish!


And that’s it!
Simple, right?
How do you love showing off your quilts? Share in the comments below so we can all get in on the quilty fun!
xo,
Shannon
Never miss a post – sign up for the weekly newsletter.
This post uses affiliate links. For more info, visit the FAQ page.

Perfect Timing! I’m about to make a wall hanging for a room in our church!! I needed this tutorial. Thank you, thank you!!
Wahoo! Thrilled it came at just the right time! I’d love to see your quilt hanging up when she’s ready!
Great tutorial! Please post more pictures of the rod and how you hang it on the wall. Thanks!
Ha! Yes! I will do that when I get her hung installed!
This is exactly how I make hanging sleeves, too. I prefer 9″ x WOF as it gives a nice pocket for a hanging rod without bulging out the front of the quilt. Great tutorial!
We twin, Yvonne!! Happy to hear we approach hanging sleeves in the same way – right down to how wide we cut our strip! 😁
This is a perfectly written tutorial. I love that this can be made for an existing (binding already on) quilt. Can’t wait to try it later this week.
I’m so happy you enjoyed the tutorial! I’d love to know how it works out for you when you try it later this week!